身份集成
为什么选择Better Auth?官网地址https://better-auth.com/docs/adapters/mongo
- 开箱即用,我们不需要重复造轮子去编写一些基础的认证功能,只需要专注于业务逻辑
- 支持非常多的认证方式,例如:
邮箱OAuthJWTSessionCookieToken - 支持很多第三方验证,例如:
AppleGoogleGithubFaceBookTwitter(X)TikTokWeChatVercel,等等还有很多其他的,我只是列出一些常用的,你可以根据你的需求选择合适的认证方式。 - 支持的数据库有:
MysqlPostgreSQLSQLiteMSSQLMongoDB - 支持的ORM框架有:
DrizzlePrisma - 支持的框架有:
NextAstroReactNuxtHonoElectronExpressElysiaSvelteSolid,等等还有很多其他的,我列出一些常见的,你可以根据你的需求选择合适的框架。
Next.js 集成
- 安装better-auth
npm install better-auth- 安装Primsa ORM框架(如果不懂Prisma请先学习ORM)
npm install prisma #安装Prisma ORM框架
npm install @prisma/client @prisma/adapter-pg pg dotenv #安装prisma客户端我们使用的数据库是pgsql
npx prisma init #初始化prisma- 配置环境变量(.env文件)在执行完成prisma init命令之后,他会自动生成一个.env文件。
BETTER_AUTH_SECRET="你的secret"#这个你可以自己写,但也可以使用openssl生成一个`openssl rand -base64 32`
BETTER_AUTH_URL=http://localhost:3000 #你的项目地址
DATABASE_URL="postgresql://postgres:123456@localhost:5432/auth" #这个是prisma自带的- 创建一个auth.ts
官方建议在src/lib/auth.ts文件中创建一个auth实例,并且导出这个实例。
import { betterAuth } from "better-auth";
export const auth = betterAuth({
  //...
});
通过prisma生成客户端文件
npx prisma generate执行完成之后他会在src/generated/prisma文件夹中生成一个client.ts文件,这个文件是prisma生成的客户端文件,我们只需要在auth.ts文件中引入这个文件即可。
import { betterAuth } from "better-auth"; //引入better-auth
import { prismaAdapter } from "better-auth/adapters/prisma"; //引入prisma适配器
import { PrismaClient } from '@/generated/prisma/client' //引入prisma客户端
import { PrismaPg } from '@prisma/adapter-pg' //引入pgsql适配器
const adapter = new PrismaPg({ connectionString: process.env.DATABASE_URL }) //连接数据库
const prisma = new PrismaClient({ adapter }); //创建客户端
export const auth = betterAuth({
    database: prismaAdapter(prisma, {
        provider: 'postgresql', //指定数据库类型
    }),
    emailAndPassword: {
        enabled: true, //开启邮箱密码认证
    },
});- 生成数据表
Better Auth 提供了一个命令行工具,可以自动生成数据表,我们只需要执行以下命令即可。
npx auth@latest generate以下内容完全是执行上面命令之后自动生成
model User {
  id            String    @id
  name          String
  email         String
  emailVerified Boolean   @default(false)
  image         String?
  createdAt     DateTime  @default(now())
  updatedAt     DateTime  @updatedAt
  sessions      Session[]
  accounts      Account[]

  @@unique([email])
  @@map("user")
}

model Session {
  id        String   @id
  expiresAt DateTime
  token     String
  createdAt DateTime @default(now())
  updatedAt DateTime @updatedAt
  ipAddress String?
  userAgent String?
  userId    String
  user      User     @relation(fields: [userId], references: [id], onDelete: Cascade)

  @@unique([token])
  @@index([userId])
  @@map("session")
}

model Account {
  id                    String    @id
  accountId             String
  providerId            String
  userId                String
  user                  User      @relation(fields: [userId], references: [id], onDelete: Cascade)
  accessToken           String?
  refreshToken          String?
  idToken               String?
  accessTokenExpiresAt  DateTime?
  refreshTokenExpiresAt DateTime?
  scope                 String?
  password              String?
  createdAt             DateTime  @default(now())
  updatedAt             DateTime  @updatedAt

  @@index([userId])
  @@map("account")
}

model Verification {
  id         String   @id
  identifier String
  value      String
  expiresAt  DateTime
  createdAt  DateTime @default(now())
  updatedAt  DateTime @updatedAt

  @@index([identifier])
  @@map("verification")
}- 执行数据库迁移 + 重新生成客户端文件
npx prisma migrate dev --name init
npx prisma generate- 挂载处理程序
要处理 API 请求,需要在服务器上设置路由处理程序。在src/app目录下新建以下目录结构
app/api/auth/[...all]/route.ts
//src/app/api/auth/[...all]/route.ts 然后把代码粘贴进去
import { auth } from "@/lib/auth";
import { toNextJsHandler } from "better-auth/next-js";
export const { POST, GET } = toNextJsHandler(auth);- 创建客户端实例配置
在lib目录下创建一个auth-client.ts文件,这个文件是客户端实例配置,我们只需要在文件中配置一些客户端的实例即可。
import { createAuthClient } from "better-auth/react"
export const authClient = createAuthClient({
    baseURL: "http://localhost:3000", //你的项目地址
})
export const { signIn, signUp, useSession } = authClient
开始体验
Better Auth 的集成确实比较麻烦,但是一旦集成成功,你就可以享受到更好的用户体验,我们就来体验一下他的基础功能。
邮箱密码登录
前提:auth.ts 里已开启 emailAndPassword.enabled: true(见上文第 4 步),且 auth-client.ts 从同一个 createAuthClient 实例解构出 signIn、signUp(baseURL 与 BETTER_AUTH_URL 一致),例如:
import { createAuthClient } from "better-auth/react"

export const authClient = createAuthClient({
  baseURL: "http://localhost:3000",
})

export const { signIn, signUp, useSession } = authClient
在任意客户端页面(例如 app/page.tsx)顶部加上 'use client',用 useState 保存表单字段,注册调用 signUp.email,登录调用 signIn.email。二者都返回 { data, error },按需处理成功或错误信息。
'use client'
import { signIn, signUp } from '@/lib/auth-client'
import { useState } from 'react'
export default function Home() {
const [email, setEmail] = useState('')
const [password, setPassword] = useState('')
const [name, setName] = useState('')
const handleSignUp = async () => {
const { data, error } = await signUp.email({
email,
password,
name,
})
if (error) {
console.log(error.message)
} else {
console.log(data)
}
}
const [signEmail, setSignEmail] = useState('')
const [signPassword, setSignPassword] = useState('')
const handleSignIn = async () => {
const { data, error } = await signIn.email({
email: signEmail,
password: signPassword,
})
if (error) {
console.log(error.message)
} else {
console.log(data.user)
}
}
return (
<div>
<div>
<h1>注册</h1>
<input type="text" placeholder="Name" value={name} onChange={(e) => setName(e.target.value)} />
<input type="text" placeholder="Email" value={email} onChange={(e) => setEmail(e.target.value)} />
<input type="password" placeholder="Password" value={password} onChange={(e) => setPassword(e.target.value)} />
<button type="button" onClick={() => handleSignUp()}>Sign Up</button>
</div>
<hr />
<div>
<h1>登录</h1>
<input value={signEmail} onChange={(e) => setSignEmail(e.target.value)} type="text" placeholder="Email" />
<input value={signPassword} onChange={(e) => setSignPassword(e.target.value)} type="password" placeholder="Password" />
<button type="button" onClick={() => handleSignIn()}>Sign In</button>
</div>
</div>
)
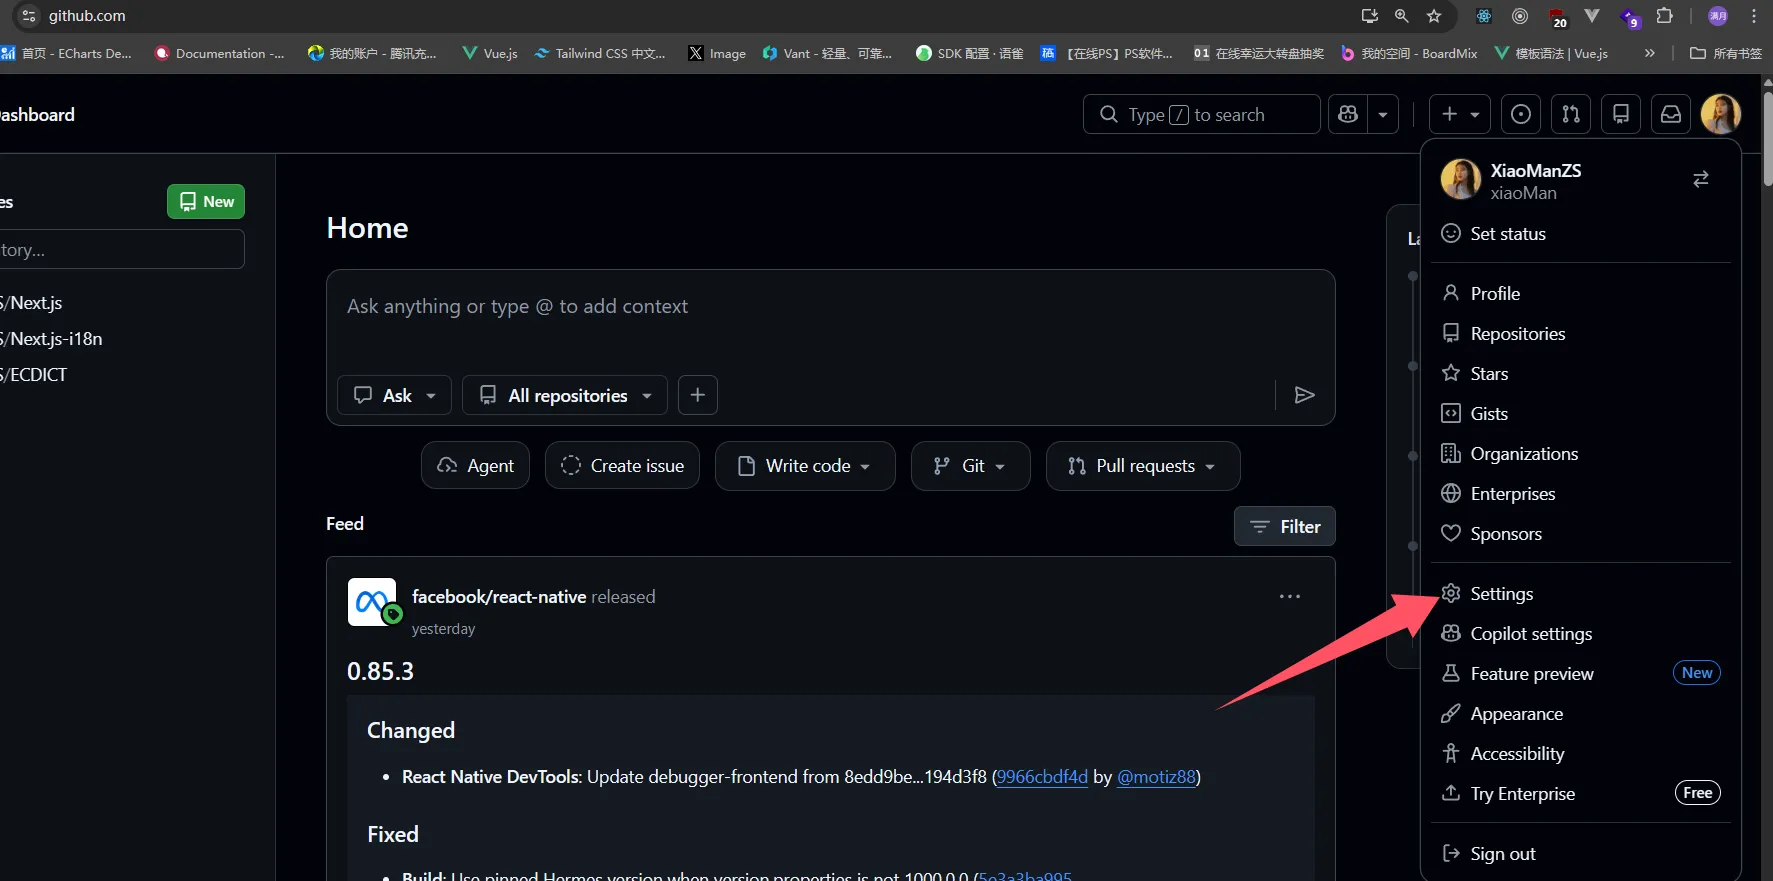
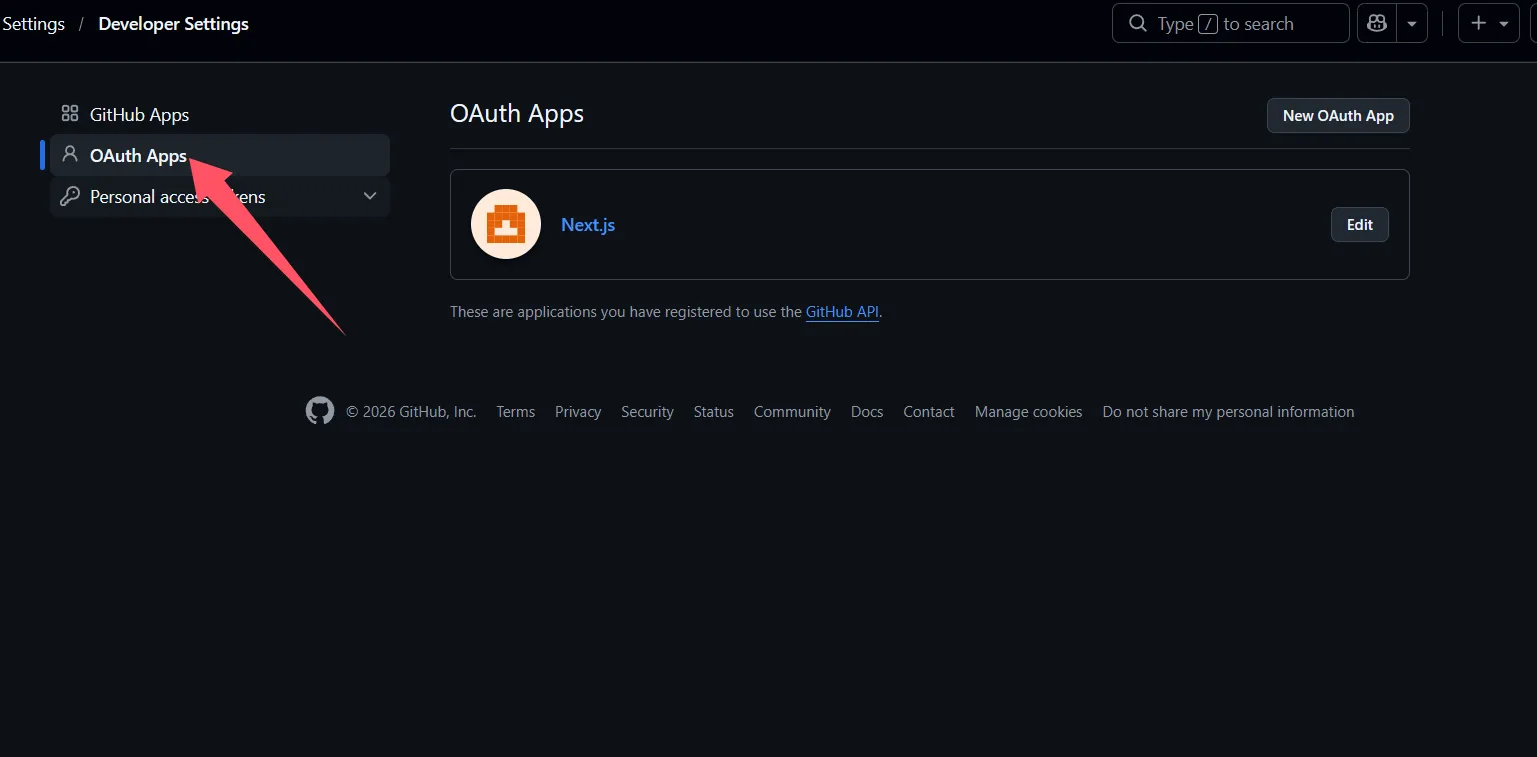
}GitHub 登录
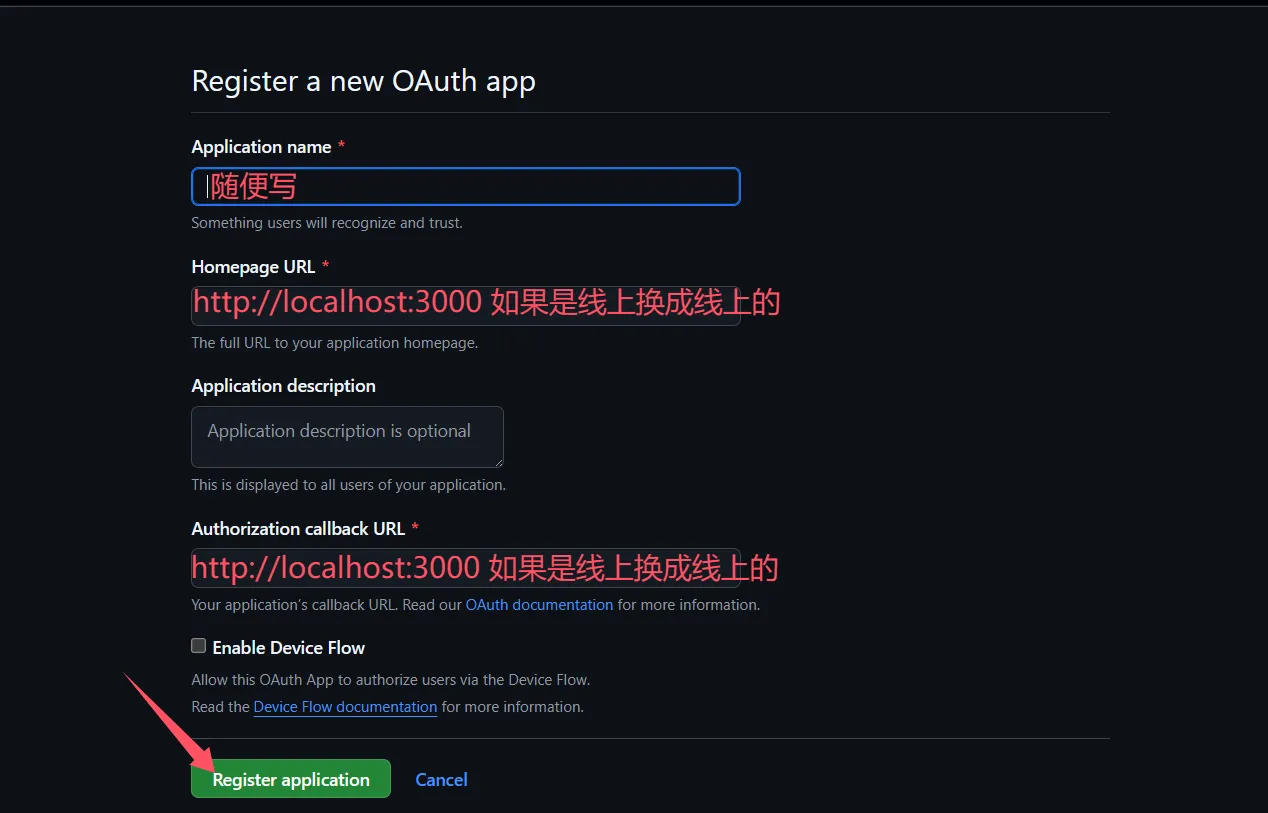
- 在 GitHub → Settings → Developer settings 中新建 OAuth App,Authorization callback URL 填:
http://localhost:3000/api/auth/callback/github(生产环境改为你的域名下的同路径)。
图文教程

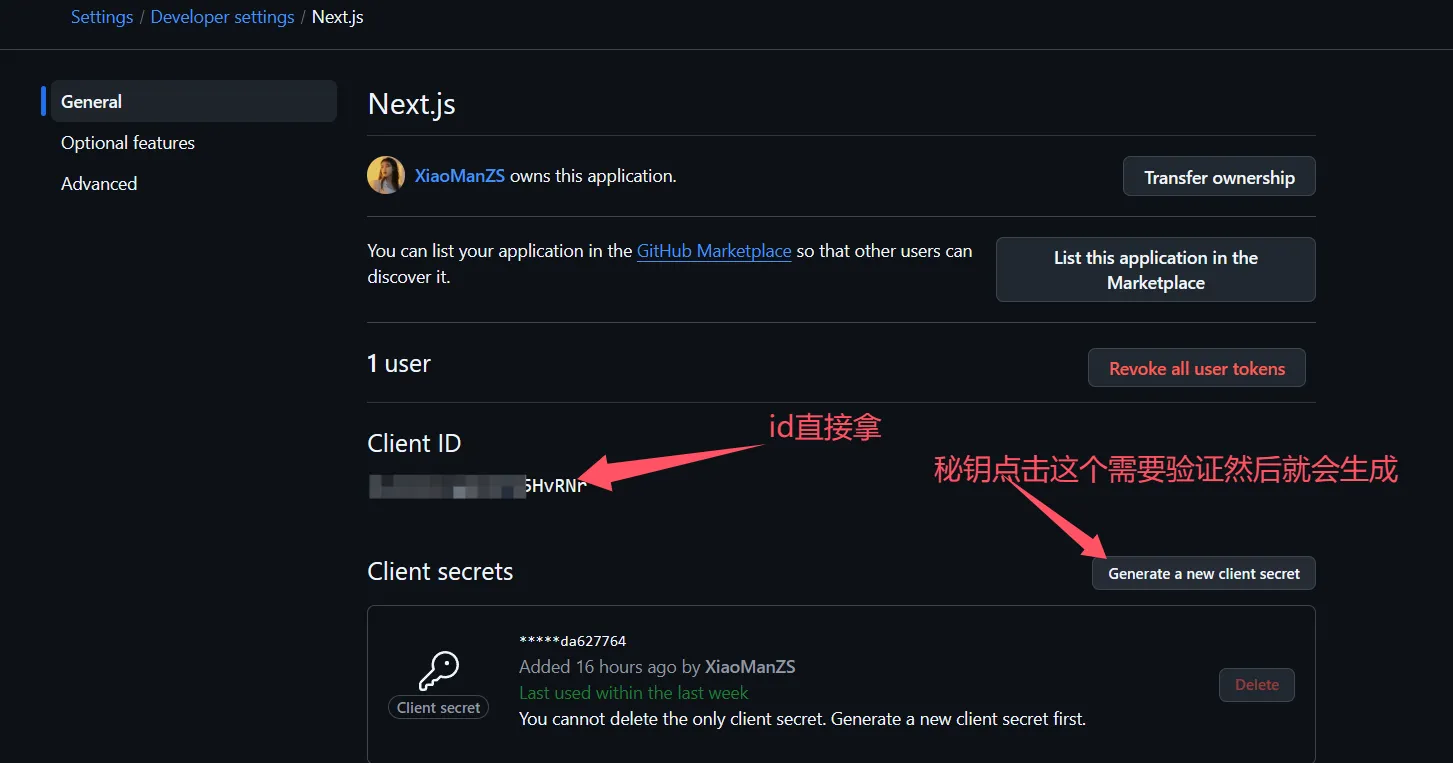
- 把 Client ID、Client secrets 写入
.env,并在auth.ts的betterAuth({ ... })中增加socialProviders:
socialProviders: {
  github: {
    clientId: process.env.GITHUB_CLIENT_ID as string,
    clientSecret: process.env.GITHUB_CLIENT_SECRET as string,
  },
},
GITHUB_CLIENT_ID="你的 Client ID"
GITHUB_CLIENT_SECRET="你的 Client Secret"- 客户端使用
signIn.social,provider为'github'。成功时通常会重定向到 GitHub 授权页,授权完成后回到站点;若返回error,打印error.message排查配置或回调地址。
const handleGithubLogin = async () => {
  const { data, error } = await signIn.social({
    provider: 'github',
  })
  if (error) {
    console.log(error.message)
  } else {
    console.log(data)
  }
}

// JSX 中
<button type="button" onClick={() => handleGithubLogin()}>GitHub 登录</button>
可将该按钮与上文邮箱注册/登录放在同一页面,完整示例只需在 return 中增加 <hr /> 与上述按钮即可。